-
Shower Panels & Boards
- Wall Panels by Feature & Colour
- Multipanel
- Showerwall
- Perform Panels
- Wetwall
- Mermaid Wall Panels
- DuraPanel
- BerryAlloc
- Nuance Bushboard Shower Panels
- Reflect Wall Panels
- Neptune PVC Panels
- MEGAboard PVC
- Wetpanel M1 PVC
- Splashpanel
- ProPlas Tile PVC
- Lustrolite Acrylic
- Atlantis Metro Tile Wall
- PlumbWall 4 PVC Wall Panels
- View all products...
-
Showering
- Shower Doors & Enclosures
- Shower Trays
- Shower Valves
- Bath Shower Screens
- Shower Accessories & Spares
- Shower Pumps
- View all products...
-
Bathroom Suites
- Complete Bathroom Suites
- Baths
- Toilets & Bidets
- Basins
- View all products...
- Taps
- Furniture
- Radiators
- Ceilings, Floors, Tiles
- Accessories
- Extras
- Plumbing
- Wet Rooms
-
Shower Panels & Boards
- Wall Panels by Feature & Colour
- Multipanel
- Showerwall
- Perform Panels
- Wetwall
- Mermaid Wall Panels
- DuraPanel
- BerryAlloc
- Nuance Bushboard Shower Panels
- Reflect Wall Panels
- Neptune PVC Panels
- MEGAboard PVC
- Wetpanel M1 PVC
- Splashpanel
- ProPlas Tile PVC
- Lustrolite Acrylic
- Atlantis Metro Tile Wall
- PlumbWall 4 PVC Wall Panels
- View all products...
-
Showering
- Shower Doors & Enclosures
- Shower Trays
- Shower Valves
- Bath Shower Screens
- Shower Accessories & Spares
- Shower Pumps
- View all products...
-
Bathroom Suites
- Complete Bathroom Suites
- Baths
- Toilets & Bidets
- Basins
- View all products...
- Taps
- Furniture
- Radiators
- Ceilings, Floors, Tiles
- Accessories
- Extras
- Plumbing
- Wet Rooms
Classi Seal Installation Guide - Video
How to install a Classi Seal to your bath or shower tray to prevent leaks. This how to installation video guide will show you the step to take to install a Classi Seal to prevent leaks.
|
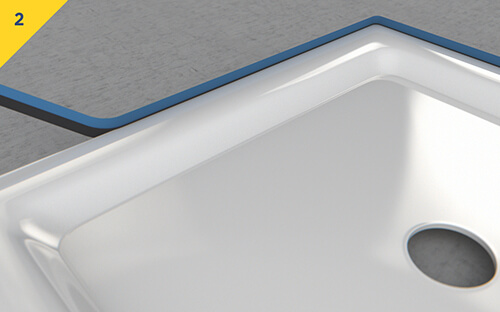
STEP 1 Remove the backing paper 100mm at a time. Align the top of the adhesive strip with the top edge of the shower tray or bath and firm press on by hand. |
 |
|
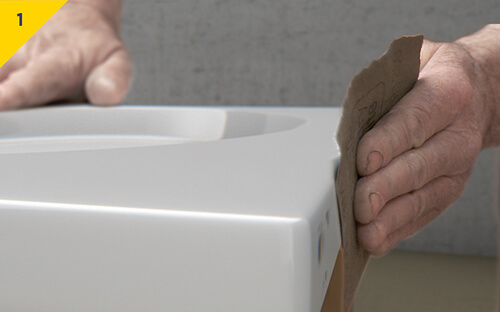
STEP 2 Thoroughly rough and clean the sides of the tray or bath that the Classi Seal is to be attached. |
 |
|
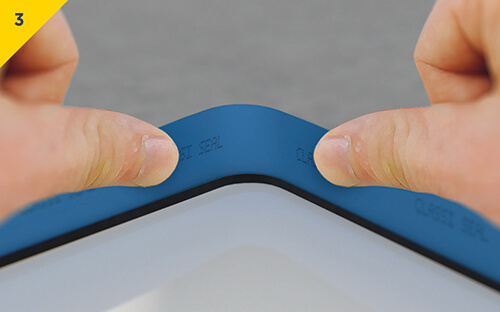
STEP 3 Manipulate and widen the upstand at corners. Upstand is easy to manipulate by hand to fit into irregular internal corners which are not square, so as not to interfere with the tiling. |
 |
|
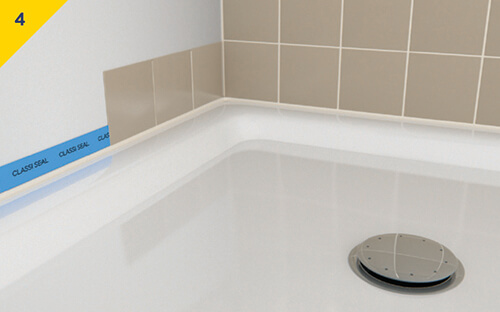
STEP4 Tiling can begin immediately. Following tiling or wall panelling, finish with a Neutral Cure Sanitary Grade 100% Silicone. Classi Seal prevents leakage from around shower trays and baths caused by the inevitable shrinkage and movement within buildings. |
 |
Classi Seal is from a group of products knows as a shower tray upstand , or shower tray seals. These can be purchased here.
This guide was created for reference only. www.rubberduckbathrooms.co.uk can not be held responsible for injury or damage caused if you decide to use this method.


